¶ Getting Started
Welcome to TDT-Asset Manager, a comprehensive tool for managing student devices, assets, repairs, and assignments. It is used by technology directors, coordinators, help desk staff, and front office staff to track and manage devices across the district. This guide walks you through the basics of signing in, navigating the home screen, and understanding the status icons you will encounter throughout the application.
¶ Logging In
TDT-Asset Manager is moving all users to Single Sign-On (SSO). Local Account Authentication (signing in with an email and password set up directly in TDT-Asset) will be deprecated on July 1, 2026, so SSO is the recommended way to sign in.
Sign in with SSO
- Go to your district's TDT-Asset web address.
- On the Please sign in screen, select Go To TDT-Asset SSO.
- Select the sign-in method your district uses, then follow the prompts and authenticate using your district credentials. When prompted, allow pop-ups or additional permissions.
- Once authenticated, you will be redirected to TDT-Asset Manager.
Sign in with a local account (available until July 1, 2026)
- On the Please sign in screen, enter your Email address and Password.
- Select Sign in with Local Authentication.
If you cannot sign in
- Confirm you are using your district's correct TDT-Asset web address.
- If you were idle for a while, your session may have timed out and returned you to the sign-in screen. Sign in again.
- If you still cannot get in, contact your district administrator, who manages user accounts and access.
¶ Understanding Your Role
Your role determines which menus and actions you can see and use. Two people may see different options in the navigation bar depending on the privileges assigned to their role. If a menu item or button described in this guide does not appear for you, your role may not include that privilege, and your district administrator can adjust your access.
¶ Building Filters
A building is a school or location in your district, such as an elementary school, a high school, or a central office. Every device and owner can be tied to a building, and a device's detail page shows both an Owner's Building and a Device's Building.
Buildings let you narrow what you are looking at. Lists such as Device Management, and dashboards such as Open Incidents on the home screen, include a Building filter so you can focus on a single building instead of the whole district.
Your account may also be set to show only certain buildings. If you do not see devices, owners, or incidents you expect, your building access may be limited. Your district administrator manages this.
¶ School Year Context
TDT-Asset Manager organizes much of your data by school year. Your district sets a School Year Start, which determines when one school year ends and the next begins.
Many lists and reports default to the current school year, so by default you see this year's devices, incidents, and fees. Where a Full History option is available, you can switch from the current year to view records from earlier years.
When a new school year begins, the active school year rolls over. Older records are not deleted; they stay available under full history.
¶ Home Screen Overview
After signing in you will land on the Home Screen. Key areas include:
- Home Button – click to return to the home screen from any page.
- Navigation Bar – the top navigation bar contains dropdown menus: Assign, Incidents, Devices, Reports, and Admin. The exact options available depend on your role.
- Universal Search Bar – located at the top of the page, this bar lets you search for owners, devices, and incidents by asset tags, serial numbers, or other identifiers.
- Help Menu – access interactive guides, downloadable guides, or send feedback.
- User Profile Menu – click your name in the upper-right corner to edit your profile or sign out.
- Hand 'em out – a quick-access widget on the home screen for assigning devices to students, staff, or groups.
- Open Incidents – a dashboard widget showing counts of open incidents by type (Forgot Device, Lost, Needs Repair) with direct links to filter the incident list.
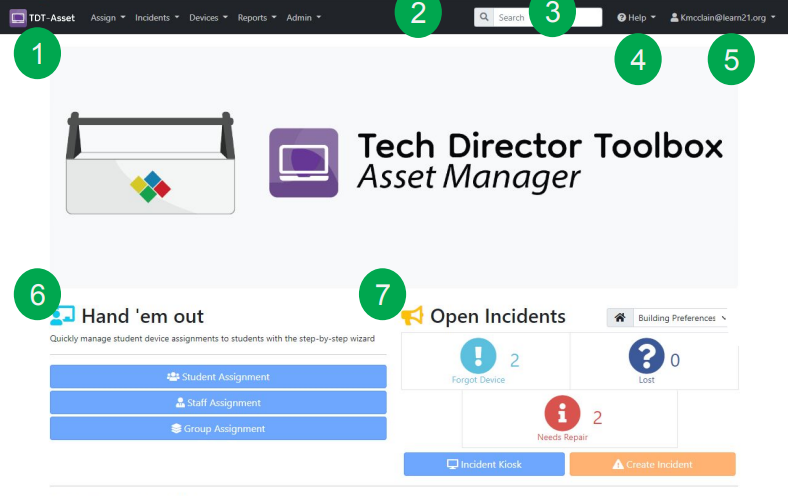
Reminder: You can always return to this home screen by clicking the Home button in the navigation bar.
¶ Universal Search
The universal search bar allows you to quickly locate owners, devices, and incidents. Type a name, ID, serial number, or asset tag to search.
You can also search by label. Type # in the search bar to switch to label-based search, then enter the label you are looking for.
Note: Icons appear in tables, search results, and device lists to give quick visibility into the status of each asset.
¶ Activity Log
TDT-Asset Manager keeps an Activity Log of significant actions, so you can see what changed, who made the change, and when. The Activity Log appears on the detail pages for devices, incidents, and owners, with columns for the Date, the Event, and who made the change (Modified By).
Use it to trace what happened to a device or an owner, such as when a device was collected, a note was added, or a repair case was updated.
¶ Attachments
You can attach files to a record to keep supporting documents together, such as photos of damage, receipts, or signed forms. Attachments are available on device, incident, and owner records. On the record's detail page, open the Attachments panel and select Attach File to add one or more files (this button reads Attach Another File when the record already has attachments). To open, download, or delete a file, right-click it.
Supported file types: JPEG, JPG, PNG, GIF, HEIC, PDF, DOC, DOCX, TXT, CSV, XLS, XLSX, MP3, MP4, MOV, WEBM, ZIP, 7Z, and RAR. The list of allowed file types is set by your district.
¶ Help Resources
The Help menu in the top navigation bar gives you several ways to get assistance:
- Interactive Guides – guided, in-app walkthroughs.
- Printable Guide – a printable reference guide.
- Self Service User Guide – a guide for the self-service experience.
- Feedback – send feedback about the application.
The menu also shows a "How can we help?" contact your district can use to reach support for anything this guide does not answer.
¶ Next Steps
Now that you are familiar with the basics, continue to the Device Management guide to learn how to create and manage device records and perform assignments.